Wednesday, November 11, 2009

My little magic women...or... I would if I could!

As I've said before I like to make things
and some times
the reasons for making whatever I make
are not really very clear or concise
except for the fact I need to be busy and I like pretty things.

In another words,
it gives me a reason to go by my day-by-day,
gives me positive karma
and doesn't leave me much free time
to think about what should not be thought about.


You know... I remember watching that series Bewitched

when I was just a 8 or 10 year old

and remember thinking
how great it would be if I could make thinks happen
(or not)
just by twitching my nose.
Thinking about it now
makes me realize that maybe this is the reason
I always try to make things better
(as I would if I could really be magical).

Anyway...
all this talking about improving things
or change them for the better
is what I'd like to talk about today.

About the little magic I try to have in my life everyday.
About some of the stuff that I make which has no other purpose rather
than being pretty and a little bit magical.

My walls are covered with this little things I make
that make me feel pretty special and happy about it.

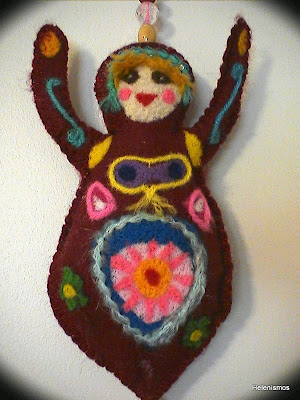
Like this fairies/angels/goddesses.

I made them from felt and some embellishments (like needle felting, beads, yarn, and so on).
They hang on our bedroom walls and I know they watch over us.


They are my little magic women...


Also these strings of beads and tiny fabric pillows,
embellished
with buttons and metallic trims.
It's almost like they're charged with a tremendous amount of positive energy.
They always make me feel good just by looking at them.


The same philosophy, the same principle,
the string of hearts,
embellished with buttons, some embroidery and beads,
they also hang on the wall and fill us with daily good positive energy.


In our house,
one can always find,
hiding everywhere and all over the place,
little critters and wee creatures


that just sneak on you

and make you feel like you are worth a million bucks!


Tuesday, November 3, 2009

Babushkas (sorry, I mean Matryoshkas) and crocheted slippers and Xmas gifts


I've finished my fabric Babushkas
(I know, I know, not Babushkas but Matryoshka,
like I've told you before);
I think they came out really well.


They all live on my shelf at the dining room...

and they seem very happy with it... :0)

They are made of scraps from my other projects that I pieced together on a random manner.
I've then cut each doll's shape twice (front & back) on the fabric that I had pieced from scraps
and I used a muslin fabric for the lining,
so for each doll there's 4 pieces of fabric.

After sewn them together and turned it inside out, filled them with filling,
the fun part starts:
cut out the scarf and the face from felt
and hand applique them with matching floss colors.


I really like them!
Like I've told you before I just have a thing about Babushkas, sorry, Matryoshkas!

I have been working on another project related to my Xmas gifts.


The crocheted slippers made out of granny squares.
I've found this project a while back
and have already talked about it a little bit in here.
It's a very simple project and so I already made 5 or 6 pairs.


I also made some Xmas baskets
(the same project as the Halloween baskets),
bought some moisturizing cream, some socks, and put everything together, like this:


I will ad a printed card with instructions
for a homemade foot cream recipe
and also some directions how to make and enjoy a homemade foot spa

(but these I still have to write and print them out).
Anyway, these are the baskets I've already done.


I'm pretty sure some of these will make their way to Portugal this year!...:0)

Monday, November 2, 2009

Napkins holder tutorial


Now that Halloween has come and gone,
I've been trying to focus and speed up my Christmas gifts production
and also trying to come up with some new ideas.

And because I am on a basket mood,
I remembered I had seen a fabric basket somewhere long ago.
So... I've decided to make one by memory and it came out pretty good.
And because it's so easy and neat
I made a quick and simple tutorial
if some of you would like to make one... :0)


First, cut three 11 inches squares: 1 cotton print for the outside, 1 cotton print for the inside and 1 of batting.


From the outside fabric cut a strip 32 inches long by 2 inches wide.


Press it in half and then press one of the halves to the center

and then the other half (as if you're making a bias tape);

press it in half one more time.


Stitch both sides of the tape the closest to the border that you can.


Start by placing the inside fabric square on top of the batting square, right side up.

On the inside fabric mark 3 inches to each side from each corner (you'll have 8 marks).


Cut the tape you've made into 8 equal 4 inches segments;

place and pin each tape segment at the marks you previously made

(report to the pic above).

Don't forget, the tapes must lay to the inside of the square like shown above.


Then place the outside fabric right side down (wrong side up) on top of the inside fabric and pin it in place.


Machine stitch it all around and don't forget to leave a small opening so you can turn it inside out.


Turn it inside out.


Slip stitch the opening with small stitches, and then, about 1/2 inch from the border, top machine stitch all around.


On the inside fabric mark a 5 inches square in the center of the fabric; machine stitch the four sides of the square and then stitch 2 diagonals forming an X on the inside of the square.

Tie the four corners on a bow
and fill it up with the napkins of your choice!


Enjoy!

Saturday, October 31, 2009

Trick or Treat!.... Happy Halloween!

That's it. It's here.

Last day of October.

The 31 ...

Halloween!


Trick or treat!

I already had some Halloweeners coming by...


an Indian Princess and a Miss Kitty and a Jacob as himself... lol...

and the evening is still young...
I wonder who else might be coming knock at my door....
boooo.....


Happy Halloween everybody!!


Monday, October 26, 2009

Tunisian crochet tote, quilted fabric pouch, T-shirt bag and... sarubobo!

I've got several different matters to share with you today.

The first being that J has not been well
and I've been fighting myself not to take him to the ER.

I'm scared to death of what this H1N1 might do to him.

I guess I'll have to wait and decide what to do

(he's still feverish tough not as much as 3 or 4 days ago).


With all this going on I don't have much time left,

but I've been working a little bit,

just trying to keep my mind away of things for a little while.


So... I finally finished the Tunisian crochet bag I had started late September while with J at the hospital.

After crocheting the front and back panels I decided I would like some kind of applique, so I went for a crocheted flower.

The little critter crawling up the flower stem... ahhhhhh!.........
THAT is a sarubobo
and I've found it here.
I've to tell you...
I just love this girl's generosity and her kindness
and how well she manages her tutorials....
Thank you very much for sharing, Mai!

Inspired by her I decided to make also a little fabric pouch
(of course, just an excuse for another sarubobo...lol).


I've used some left overs from a quilt; pieced them together,
cut a piece of batting and a piece of lining about the same size as the pouch
and quilted them together.

To fasten it off

I've used a big button
and for the fastener
as well as for the sarubobo I used the same printed lining fabric
(I love this word...sarubobo ... lol...
from reading Mai's blog my understanding is that it means baby monkey...).

While surfing the net just looking for trapilho
(my sister has sent me two craft magazines from Portugal for my BD.. :0) ... and they are about trapilho works).
Of course I tried different research approaches to find out how to make or to buy trapilho here in the USA,
and I did find out a very easy way to make T-shirt yarn (you just cut it out from a T-shirt... lol... but I found a good tutorial on you-Tube).
And this was the closest for trapilho that I've found.
Of course I already bought tape yarn from Joann.com
(the package should arrive tomorrow).
I'm willing to pursuit this trapilho thing for sure...

Anyway...
all this kind of talk to tell you about my new T-shirt bag!

LOL... there we go...while surfing looking for trapilho, I found out about making a T-shirt bag just using duct-tape and staples...

This is how it looks like after is finished.
The front and back have some iron-on appliques;
a dancing cow and a guitar playing pig... :0)


As you can see from this pic the insides are... duct-tape!

It's really easy and quick to make one:
grab a T-shirt you don't wear any longer, cut the sleeves out,
turn it inside out, and start taping it... You'll have to tape the whole thing and try not to get any wrinkles on the front, which I got... :0(
When it's all taped out, fold it (so the handles present themselves the right way) and staple the bottom.

Next step, fold each corner into a triangle, and staple it.

That's it! Turn it inside out again et voilà!

You got yourself a nice looking T-Shirt bag!
Oh!... almost forgot... I did my iron-on applique before taping it!

And I reckon that's about it for the latest craft stuff...

For last but not least....

I got a Kreativ Blogger award!
YAYYYY!.........


Rochelle from Acquiredflavor gave me the award!
Thank you so much Rochelle!
I understand that I should choose 7 other blogs
and pass this award to them
and link to them here too...
which for sure I'll try to do soon,
I just need a little time to do that!
But in the meanwhile...
check out Rochelle's blog.
She does an outstanding job,
not only in her kitchen but in her live.


Believe me, I would know:
her little one is my grandson and her husband is my son...:0)