Saturday, December 11, 2010

The making of a fancy hexagon shoulder bag

Early morning today
I finished my new hexagon bag!
Yay!!!


Sometime ago I've told you about
how I'm getting addicted to make this hexagons!
I think it has been kinda of therapeutic...
So, I'm going to tell you how this works for me:
I start with an image on my mind,
and just go from there.
I make a template by designing the bag shape into paper, and cut it out. 
Then decide which coordinating fabrics to go with.
 The next step is to cut small squares to form the hexagons.
Hand sew all the hexies (with the paper hexagon template inside), 
and then hand sew them all together to form the flower,
the size I want it to be.
Remove all the paper hexagons from inside,
press it with the hot iron,
then machine applique the flower
on the background material
(double lined to make it a little more stiff).
When the bag is finally starting to look like a bag,
the details just start popping in my brain:
how to go with closures,
lining,
inside pockets,
handles,
embellishments...

I'm very pleased with the final result,
and the all process was very relaxing and soothing.
I hope I was able to make you wish to try this patchwork technique.
I'll be seing you all soon!

Tuesday, December 7, 2010

Small felt pouch tutorial

This cold wave brought us more snow today,
the first real thick enough to lay down
and it looked very pretty in the morning,
but boy!..., it's really cold!
With this cold it doesn't feel like going out,
for sure,
so I kept busy sewing during most of the day.
I'm going to share with you all
what I made today,
a very easy and small tutorial,
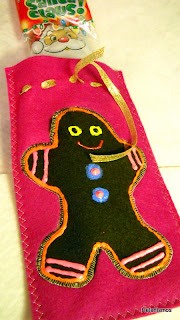
about a felt pouch to stuff with whatever you might like.
In my case, I had some chocolate Santas
and thought they would look much better inside a small pretty pouch.


Start by cutting 2 rectangles from what color felt you would like
and in the size you need (depending in what you're using the pouch for).
Then cut out a Xmas shape in a different felt color
(for the template I've used some of my Xmas cookies cutters).
With a coordinating color tread
machine applique the shape into one of the rectangles,
using a decorative stitch.
Join the 2 rectangles
by zigzagging together 3 of the sides,
leaving a top opening.
Once the sides of the pouch are sewn
tread a pretty ribbon trough the top side, like this.
With dimensional fabric paint decorate your Xmas shape as you will.
Use some glitter too.
Ta-da-da!... Your pouch is all done!
Fill it with your stocking stuffer.
Isn't it pretty?
Go ahead,
make a bunch.

I hope this will put you in the mood for some sewing!
I'll be seeing you all soon.

Monday, December 6, 2010

Sock monkey and patchwork table center

After the first "almost real" snow yesterday
(it was just a little bit and didn't stuck),
today is as much cold as it was yesterday.
I think we must be around 20 something Fahrenheit.
My son, of course, will laugh
and say that's warm!
(compared to his minus something back up there in Canada).

 But it's nice and toasty inside
and Baby spends most of her time laying in front of the heater.

 
I was sewing all day long yesterday and pretty much doing the same today. And yes, still working on some Christmas gifts.
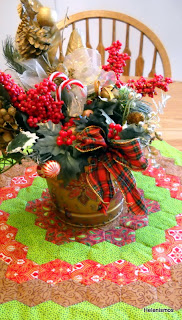
Another hexagon table center is finished.
The overall color look and scheme was deliberate
and aiming a specific kind of decor.
Shh!!! It's a surprise!,
for Xmas, remember?

I'm also surprised with myself,
for enjoying so much this type of patchwork.
I really do like to make these hexagons!
I'm almost addicted to it.
Another finished project, a requested sock monkey girl,
all dressed up and ready to party.
I usually use white socks because they are longer
(it makes longer legs)
but don't dislike this dark blue color
(I know, it's not the original sock monkey color...
... but those are so expensive...
... it makes me think that if I buy them to make sock monkeys
I am adulterating the whole purpose and concept of sock monkeys!...).

And that's it for now.
Still working on some other stuff, which I'll show you all later.
Bundle up, and enjoy this wintery days!

Friday, December 3, 2010

Handmade Christmas Gifts

It has been more then a week since Thanksgiving,
but it has been a busy week,
between sewing, medical appointments,
baby sitting
and everyday chores...
... I was left with no time for blogging.
But today I was able
to take and edit pics
from what I've been working on.
First, a big accomplishment,
due since before Christmas last year:
I finally finished a quilt intended for a Christmas gift.
I'm happy with the final result,
and I hope the recipients will enjoy it as much as I did making it
and it's now all ready to go.
Another intended Christmas gift,
a hexagon quilted table center.
I like the colors and the final color/effect combination.
It's also ready to become a gift.
Some time ago
I had found a tutorial about making a basket/bowl/box
out of yarn and clothe line.

This was my first try out
and didn't came out bad.
I will experiment with other colors/type of yarn
and maybe add some embellishments. 
Maybe as stocking stuffers
I've finished a couple more fuzzy hair scrunchies,
 and some flower felt key rings.
Also finished another Tunisian crochet lined pouch,
and a couple of softies, tough I still got a couple more in the forge.
And finally some christmassy felt coasters,
this time all sewn in the sewing machine.
They ended up pretty too.

And that's some of the things I've been making
with my thoughts
on the upcoming holidays.
I'll see you all shortly. 

Friday, November 26, 2010

Artichoke and Spinach Dip Recipe

For Thanksgiving evening
I was supposed to go to my stepson's
but I've fallen asleep
(I do get up very early in the morning, around 4:00 am).
Anyway,
earlier I had fixed a dip J loved
both to eat as to prepare.
I'll share the recipe with you, tough it is not mine.
I have  had it on my recipe book for a long time,
but it was cut out from some magazine,
which I don't recall the name.

For the recipe's ingredients now.
You'll need:

1 stick butter (1/2 cup)
1 medium chopped onion (1 cup)
2 pkg. frozen spinach, thawed and drained
1 can of artichokes hearts, drained and chopped (14 oz)
1 pkg. cream cheese (8 oz)
1 pkg. sour cream (8 oz)
1 cup shredded Monterey Jack cheese
1 cup grated Parmesan cheese
2 tbsp Tabasco pepper sauce
salt to taste

How to make it:
Over medium heat and in a big sauce pan melt butter.
Add chopped onion and let it cook till soft, about five minutes.
Stir in spinach, artichokes, cream cheese, sour cream, Monterey Jack and Parmesan cheeses, Tabasco pepper sauce and salt. Stir well in between additions and keep stirring till well blended and heated through.
Pour the mixture into the slow cooker (small cooker, 1 quart) and let it cook in low for a couple of hours.

This is how I fixed mine.
But if you don't have a slow cooker, pour the mixture into a oven proof casserole or other dish.
Sprinkle the top with a bit of the Monterey Jack and the Parmesan.
Bake in a 350F oven until the cheeses start to brown.
Go ahead, dip in! It's delicious!

I'll see you all later.