This cold wave brought us more snow today,
the first real thick enough to lay down
and it looked very pretty in the morning,
but boy!..., it's really cold!
With this cold it doesn't feel like going out,
for sure,
so I kept busy sewing during most of the day.
I'm going to share with you all
what I made today,
a very easy and small tutorial,
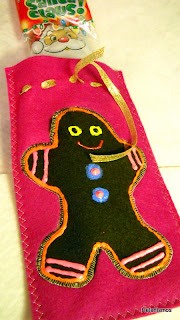
about a felt pouch to stuff with whatever you might like.
In my case, I had some chocolate Santas
and thought they would look much better inside a small pretty pouch.
Start by cutting 2 rectangles from what color felt you would like
and in the size you need (depending in what you're using the pouch for).
Then cut out a Xmas shape in a different felt color
(for the template I've used some of my Xmas cookies cutters).
With a coordinating color tread
machine applique the shape into one of the rectangles,
using a decorative stitch.
Join the 2 rectangles
by zigzagging together 3 of the sides,
leaving a top opening.
Once the sides of the pouch are sewn
tread a pretty ribbon trough the top side, like this.
With dimensional fabric paint decorate your Xmas shape as you will.
Use some glitter too.
Ta-da-da!... Your pouch is all done!
Fill it with your stocking stuffer.
Isn't it pretty?
Go ahead,
make a bunch.
I hope this will put you in the mood for some sewing!
I'll be seeing you all soon.


No comments:
Post a Comment