Pages

Sunday, May 23, 2010

A little Portuguese history...a little Portuguese Music...a little Portuguese Super-Star Mom!

Some time ago I've told you I was born in Africa,
in S.Tome e Principe.
So now you know where S.Tome e Principe is located...
As you can see,
S. Tome is one island and Principe is another island.
S.Tome is the island where I was born,
and tough I do not remember my time there
(I do remember my years in Angola and Mozambique),
I can still hear my parents telling me
it was the most beautiful place they've ever lived in.
 
As a matter of fact three of us (me and two brothers) were born in Africa.
The other three (my sister and the two younger brothers)
were born in
Portugal main land in Europe.
My dad was in the military and was placed in different countries of Africa
(then Portuguese colonies) 
during our growing up lives..
But all of us did live in Africa, sometime or another
(except for my baby brother, born in the same year
we all came back to Europe for the last time),
and my childhood was spent between Africa and Europe.
And today I live in North America... life can be weird, don't you think?
Why am I telling you all this?...
Because today I want to take you with me down memory lane,
sharing some pics and some music too.
My older brother
once introduced me to Joao Afonso music,
taping me a collage of one of his albums called Missangas.
This song (Fugir com o Cientista) is part of that album. 
Joao Afonso also lived in Africa
and his so beautiful music has lots and lots of African influence.
Carteiro em Bicicleta
is one of his most famous songs,
and really, really good music, wouldn't you say...?
Joao Afonso is
Zeca Afonso nephew.
Some of you know very well whom am talking about...
but for those of you who don't...
Zeca Afonso
 is (was) the most famous Portuguese Revolutionary Singer
(from before and after the Revolution)
and it was one of his songs
(Grandola Vila Morena)
that triggered the broad casted code
for the Portuguese Military Revolution in April 25th 1974.
No blood shed, only the people's will and
the soldier's carnation guns made it all happen...
no more war, no more deaths in the war...
I remember my mom just saying
"Thank Goodness my son will not go to the war!"
She was talking about my older brother who at that time
was about to be drafted and be called into the military.
And that was the FEAR of all the Portuguese mothers...
isn't it the same with all the mothers..., all over...?
Any How...
Africa does scar you for ever.
I used to dream of Africa, literally, when we definitely move back to Europe.
I used to wake up during the night and not being sure of where I was.
I'd miss my friends, my play grounds, my growing up fantasies...
my doll tea parties with my sister and friends,
my Enid Blyton like adventures with my school mates...
All of us girls were like The Five aficionados,
we even had a club named THE FIVE ,
and we gave each one of us the same names as the characters
and would try to run the same adventures...
I still remember the poor girl chosen to be Timmy, the dog...
if she wanted it in, she had to accept it...and she did, of course! 
So many stories and so many wonderful memories!
My older brother had the good fortune to go back
and revisit Africa a couple of years ago
(still waiting to see some pics brother...)
and if I ever will make out my bucket list,
go back to Africa is definitely one of my top ones!
And before I finish this post about my beloved Africa,
one last thing I would very much like to share with all of you:
the beautiful movie star like
 my MOM in Africa
(Guine-Bissau),
early 50's, when she married my Dad!

(We all love and miss you Mom & Dad!) 

Saturday, May 22, 2010

Rainbows & Kittens and Snacks & Quiltings...

A couple days ago I went outside and saw...
...a huge, wonderful, colorful rainbow over my sky!...
Immediately on my brain played the song
Somewhere over the rainbow...
I LOVE that song!
I've found this one on YouTube from Eric Clapton,
and I couldn't resist to insert it in here for all of you to enjoy:
And since today I'm about sharing beautiful things...
 I just can't resist to show you...
at first I thought they were only three...
 
 
Oh boy!, was I wrong!...
There's six of them,
 but the mama took one away and I can't find it.
Aren't they gorgeous?, the cutiest little things!
They all have problems with their eyes, so I've been washing it every day, hopping they will be alright.
Who could resist and not take care of these cuties...?

They are my friends and keep me company.

 
Any who...
Also during this last week
I've finished another string quilt.
It's a smaller one (about crib size) and I think it came out pretty good.
 
 
It's quite fun to make this string quilts,
and I'm already planning a new one.
I'll show you when it's done.
 
I've also been cooking a little,
and I had been looking for quick and simple recipes,
kinda like quick snacks.
I found one for tuna bites
(in one of my culinary books).
Very easy and quick, and tasty also.
For the ingredients you will need: 
  • 2 tuna cans (in water), drained
  • 1 egg, beaten
  • 1 cup breadcrumbs
  • 1 tbsp whole wheat flour
  • parsley
  • salt & pepper to taste
  • vegetable oil to brush

Drain the tuna and mash it with the egg, salt, pepper and parsley.
Add the breadcrumbs, mixing well, and then the wheat flour, just enough to bind everything together.
Form small balls with your hands (about 1" each).
Let it chill for about 15 minutes.
Preheat oven to 375 degrees Fahrenheit (about 200 Celsius).
Grease a cookie sheet (or just use parchment paper as I did) and space the tuna balls evenly on the sheet, brushing each one with a little vegetable oil. Bake in the oven for about 20 minutes.
Really tasty!
Enjoy!

Sunday, May 16, 2010

Snakes & turtles, fabric scraps baskets & rodilhas

This week
I got my Mother's Day gift from my son
and I'm all excited about it!
 
Can't wait to try this Celtic patterns on a quilt!, 
I promise I'll show you when I do.
Also with the book came a 5"x5" charm pack of beautiful fabric prints!
I loved it!


  Speaking of my son,
I found a couple of pics he took some years ago of a snake eating a frog,
and I thought about sharing it in here
(we were all together in Canada when the photos were taken and
I think they are quite good):
Can you see the frog on the pic above...? 
 Now you can't see it, can you...?,
but...
you actually can see WHERE the frog is, right?
I know, it's awful but yet pretty neat, isn't it?
Thought not as spectacular as the snake's
here's a couple more I took this week at the creek's banks...
Ta da!...

the snapping turtle!
There's a bigger one (I saw it a couple weeks ago, but didn't give me enough time to get the cam).
One of this days I'm going to share with you all
some of my animal photos
I took trough the last 10 years.
I will have to finish organizing all my albums in this computer
(I have been working on J's comp since mine has been sick...
still got to get it fixed.
And I'm still organizing my new laptop,
but I do have a LOT of pictures, so it will take time for sure.

What else for this last week...?
I made another fabric bowl/basket,
a couple of very cute little purses key chains
and something else I have been trying to figure out how to
for a while now...
I finally took the time and figured it out.
Did some research on the web and this is it!
I really don't know how it would be called in English,
in Portuguese it's called a rodilha or rodizio.
 
It's made out of fabric scraps
(from used old garments most of the times)
and the purposes it serves is to protect the head
when women used to carry stuff on their heads,
like this pic I found on the web shows.
It's an old picture and it pics the aguadeiros,
people that used to sell water on the streets in the late 1800's early 1900's.
The girl on the right is wearing one
and also the first woman on the right at the fountain.
Also this recent picture
that I found here.
Can you see the rodilha
between the woman's head and the basket she's carrying? 
I found the pic on a fine blog about Portugal traditional garments.
It's in Portuguese but you can always translate the page
or just look at the beautiful pics.
I am sure my son remembers seeing it at his great grandmother house back in Monsanto.
And I'm sure I'll be making much more,
not only for the fun of it but also because I really enjoy its design
and I think I will be able to find some other uses for it.

Wednesday, May 12, 2010

Floppy Disk Treasure Box Tutorial


A couple weeks ago
I showed you some pictures of boxes I made using old floppy disks,
and I had promised to come back to it.
Well, this is it.
I'm sorry it took me a little longer then I thought,
but I had to make sure I had all the right pics sequence to show you how to.
I got this idea when I saw a project made with 5 floppy disks to form like an open cube to use as a pencil container.
Each floppy disk had 4 holes drilled on to tie them together using some sort of electrical wire.
So,  I thought instead of drilling holes I'm going to use felt to make pouches for the floppy disks and then I'll sew the pouches together.
And that was treasure box #1.
I add a lid and was quite happy with the result
(don't make the lid and you'll have the open cube/pencil container).
Afterwards,
 I start thinking, I could make a different one, as an hexagon, and I could use fabric instead of felt. 
And that was treasure box #2.
I really like it.
I made the pouches out of coordinating fabrics
and inserted a square of batting in each.

And then I decided I would make another one out of felt,

and take pics for a tute.
Cute, isn't it?

OK, for the tute, here we go.
You'll need:
  • 6 old floppy disks
  • 6 felt squares for the outside (just a little bit bigger than the floppy disk, mines were 4,5")
  • 6 felt squares for the inside (4,5")
  • 2 felt hexagons for the outside (side length=4,5" on mines)
  • 2 felt hexagons for the inside (same length, 4,5")
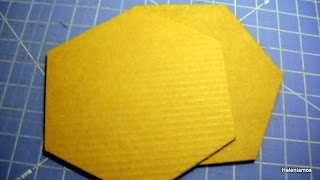
  • 2 cardboard hexagons (smaller size: side length=4")
  • felt for embellishments
  • felting mat
  • felting tool
  • glue
  • gallon/ribbon/rhinestones...
Start by choosing your inside and outside felt colours.
Cut six 4,5"squares from each color (12 total).
Cut two hexagons 4,5" side length from each color (4 total).
If you going to embellish yours like I did,
cut 1 big flower on felt for the lid,
like so, 
and six smaller ones, like so.
 Then you have to felt the flower parts together to make a whole flower.
When all the flowers are felted together,
 
you have to felt them on the outside squares and on the outside lid.
 
Now that all the squares and the lid have the flowers felted on,
 
it's time to start sewing together the squares
and inserting the floppy disk on the pouches.
Using the embroidery floss on a coordinate color and a blanket stitch,
sew together the outside and inside felt squares.
When you have 3 sides sewn together,
 
insert the disk in and sew close the last side.
Do the same with the bottom and the lid,
except for those you'll insert the hexagon cardboard
between the felt hexagons.
When everything is sewn together,

it's time to start forming the box,
that is, sewing all the sides together.
Start by sewing one side of each square to one side of the hexagon bottom,

like this.
When it's done,
it will look like this.

Then start sewing one square side to the next square, like so. 
 
And you're almost done!
The last thing to do is to sew the lid to the box:
sew one side of the hexagon lid to one side of the hexagon box.

 Embellish it as you will, and you're done!  
You have a cute treasure box for all your treasured keepsakes!
Enjoy!